HX-DR01
-
Product Introduction:
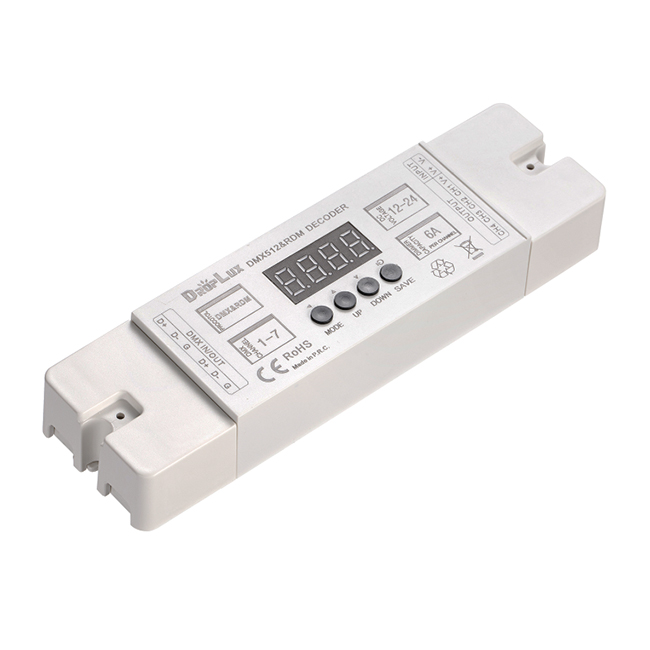
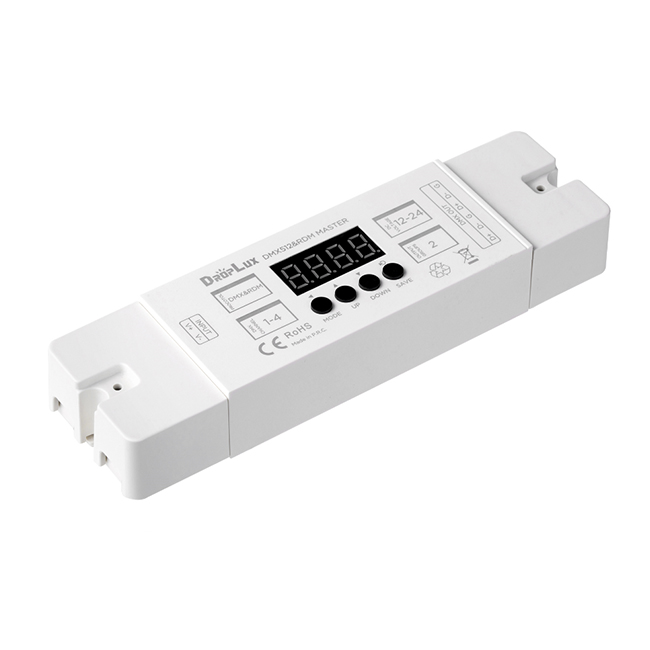
DMX512 RDM Decoder DR01 is the most advanced decoder with both DMX/RDM capable, PWM frequency / gamma curve are adjustable, the output can be set to 4 types with a total of 9 different attributes; suitable for all kinds of constant voltage LED lamps, such as Single color/CCT/RGB/RGBW LED module, LED strip, light string and so on.
Product Details
Product Features
Dimensions

Interface Specifications

Wiring Details of LED OUTPUT
Tips, factory default is RGBW, CH04.
Use Instruction
DR01 is controlled by the DMX signal system. At the same time, a built-in test function can be used to illuminate the LED load without a DMX signal during the installation process, and press the "MODE" key to switch between different test modes (displayed as "PLxx") and speed (displayed "SPxx"). DR01 has the function of automatically recognizing DMX signals. When there is a DMX signal, it will automatically enter the DMX control state. The digital tube displays the start address of the DMX (displayed as "Dxxx").
Button functions
Note: please refer to the corresponding parts for specific function description.
Set DMX start address
By pressing the MODE key, when the digital tube displays dxxx (xxx is 001-512), it enters the address setting mode. Press the UP / DOWN key to set the address (long press for quick adjustment), the digital tube displays the current address in real time (e.x. d032-start address is 32), and then press the "SAVE" key to save. DR01 is also compatible with the RDM protocol, so it can also set its address through the RDM controller. The digital tube will display the address given to it by the RDM controller in real time and save it automatically (no need to press the "SAVE" key).
Select test mode
Press the "MODE" key, when the digital tube displays PLxx, enter the test mode selection; the mode can be switched by the UP / DOWN keys.
Note: The test mode list is determined by the DMX decoding type set.
Set test mode speed
Press the "MODE" key, when the digital tube displays SPxx (xx is 01-99), enter the test mode speed adjustment. Press the UP / DOWN key to adjust the speed (long press for quick adjustment), the digital tube displays the current speed in real time (sp01 is the slowest, sp99 is the fastest).
Please press SAVE to save the setting operation, the digital tube will display "SAVE" and automatically exit the setting state after 1 second.
Advanced settings
Long pressing the MODE and SAVE buttons for 3 seconds to enter the advanced settings. After entering the advanced settings, press the MODE button can switch to DMX decoding profile setting, PWM frequency setting, Gamma curve selection and Restore factory default.
DMX decoding profile setting
Press "MODE" key, when the digital tube displays CHxx (xx is 01-09), enter DMX512 decoding profile setting. Select the DMX512 decoding profile by pressing the UP / DOWN keys.
* Master intensity/flash/full light: DMX value 0-127 master intensity, 128-250 flash, 251-255 full light.
** Preset chase list
Please press SAVE to save the setting operation, the digital tube will display "SAVE" and automatically exit the setting state after 1 second.
PWM frequency setting
Press "MODE" key, when the digital tube displays PFxx, enter the PWM frequency setting. Set the PWM frequency by pressing UP / DOWN.
Please press SAVE to save the setting operation, the digital tube will display "SAVE" and automatically exit the setting state after 1 second.
Dimming response gamma curve setting
Press "MODE" key, when the digital tube displays gAxx. Enter the gamma curve selection. Select the desired gamma curve by pressing the UP / DOWN keys.
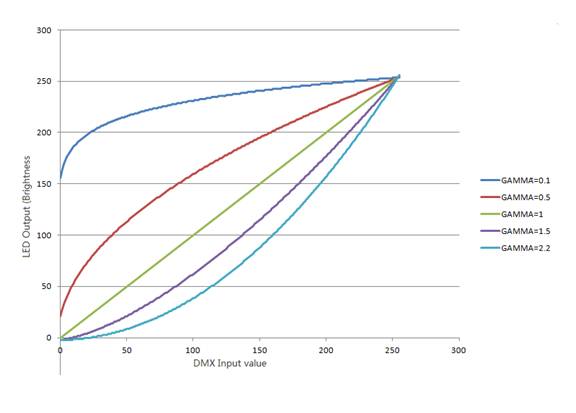
Please press SAVE to save the setting operation, the digital tube will display "SAVE" and automatically exit the setting state after 1 second.
Restore factory settings
Press the "MODE" key, when the digital tube displays rst0, enter the factory reset. By pressing the UP / DOWN key and pressing the "SAVE" key when the digital tube displays rst1, the decoder enters the factory reset. The digital tube will display rst- and switch to d001 automatically after 1 second to finish the operation.
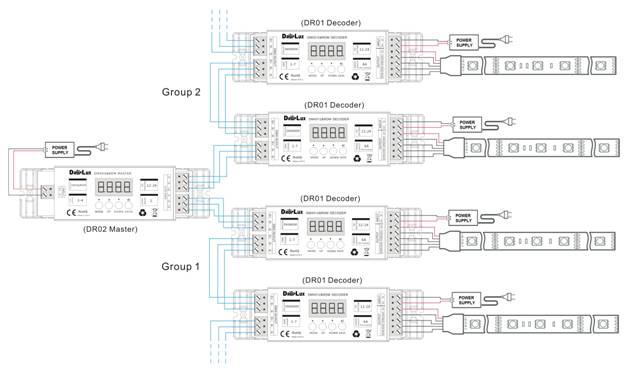
Application diagram
Notice
1. The power supply voltage of this product is DC12V ~ 24V, other voltages may damage it;
2. The lead-out wires should be correctly wired according to the labels provided in the wiring diagram;
3. When more than 32 decoders are connected, it needs to be used with DMX signal amplifiers, the number of DMX signal amplifiers does not exceed 5.
4. If the signal has a kickback effect due to short circuit or poor quality of the signal cable, please use a 0.25W90-120 ohm resistor at the end of the last decoder D + and D-;
5. This product has short-circuit protection function, but it should not be overloaded;
6. The warranty period of this product is 3 years, exclude man-made damage or the form of overload work.
Product information for placing order
- DR01 is a constant voltage decoder, the working voltage is: DC12-24V. The power supply in this range can be universal, please make sure the power supply voltage meets the requirements of the loading LED;
- Adopts pushbuttons (MODE UP DOWN SAVE) to make setting and control, the 4-digital tube displays the setting statues intuitively;
- Automatic identification signal function. When the DMX signal is connected, it directly jumps to the DMX setting start address mode (dxxx) to receive data;
- With power-off memory storage function, it will remember the settings saved in the last power down;
- 4 in 1 output types, support single color/CCT/RGB/RGBW;
- 9 different DMX512 decoding profiles are available, from CH01 to CH09;
- PWM frequency is adjustable: 500Hz, 1KHz, 2KHz, 4KHz, 7.8KHz, 15.6KHz;
- Variable Dimmer Response (Gamma) Curve;
- RDM-Capable;
- Short-circuit protection function;
- Max. Output power: 72W*4CHs/12V, 144W*4CHs/24V;
- 3-year warranty.
| Working temperature | -20-60в„ғ | Supply voltage | DC12V~24V |
| Static power consumption | <1W | Connecting mode | common anode |
| Net weight | 110g | Gross weight | 120g |
| Output gray | RGBW each 256 level | Transmit signal | DMX/RDM signal |
| External dimension | L162*W46*H25 (mm) | Packing size | L170*W50*H29 (mm) |
| Output ports | 4 channels | DMX profiles | 9 modes |
| Power off memory | Yes | Gamma curve | 0.1,0.5,1,1.5,2.2 |
| Short circuit protection | Yes | PWM frequency | 500Hz-15.6KHz |
| Max. Output current |
PWM<=2KHz: 6A/CH PWM=4KHz: 5A/CH PWM=7.8KHz: 4A/CH PWM=15.6KHz: 3A/CH |
Max. Output power |
PWM<=2KHz:288W/12V; 576W/24V PWM=4KHz:240W/12V; 480W/24V PWM=7.8KHz:192W/12V; 384W/24V PWM=15.6KH:144W/12V; 288W/24V |

Interface Specifications

Wiring Details of LED OUTPUT
| Output type | Recomended DMX Decoding Profile | CH1 | CH2 | CH3 | CH4 |
| RGB |
CH01 CH02 CH03 |
R- | G- | B- |
NC (no connection) |
| RGBW |
CH04 CH05 CH06 |
R- | G- | B- | W- |
| CCT |
CH07 CH08 |
WW- | CW- | WW- | CW- |
| DIM | CH09 | LED1- | LED2- | LED3- | LED4- |
Use Instruction
DR01 is controlled by the DMX signal system. At the same time, a built-in test function can be used to illuminate the LED load without a DMX signal during the installation process, and press the "MODE" key to switch between different test modes (displayed as "PLxx") and speed (displayed "SPxx"). DR01 has the function of automatically recognizing DMX signals. When there is a DMX signal, it will automatically enter the DMX control state. The digital tube displays the start address of the DMX (displayed as "Dxxx").
Button functions
| Button | Description |
| MODE |
1.Single press the MODE button to switch: 1) “Dxxx”: DMX start address setting, D001-D512; 2) “PLxx”: test modes setting, PL01-PLFL; 3) “SPxx”: the speed of test modes setting, SP01-SP99. 2. Long pressing the MODE and SAVE buttons for 3 seconds to enter the advanced settings; after entering the advanced settings, press the MODE button to switch: 1) “CHxx”: DMX decoding profile setting, CH01-CH09; 2) “PFxx”: PWM frequency setting, PF05-PFF0; 3) “gAxx”: Gamma curve selection, gA01- gA22; 4) “rst0”: Restore factory settings selection, RST0-RST1. |
| UP | Increase the menu data entered by the MODE key. |
| DOWN | Decrease the menu data entered by the MODE key. |
| SAVE | After any setting operation is completed, please press SAVE to save, the digital tube will display "SAVE" and automatically exit the setting state after 1 second. |
Set DMX start address
By pressing the MODE key, when the digital tube displays dxxx (xxx is 001-512), it enters the address setting mode. Press the UP / DOWN key to set the address (long press for quick adjustment), the digital tube displays the current address in real time (e.x. d032-start address is 32), and then press the "SAVE" key to save. DR01 is also compatible with the RDM protocol, so it can also set its address through the RDM controller. The digital tube will display the address given to it by the RDM controller in real time and save it automatically (no need to press the "SAVE" key).
Select test mode
Press the "MODE" key, when the digital tube displays PLxx, enter the test mode selection; the mode can be switched by the UP / DOWN keys.
| Output type | DMX decoding profile | PL01 | PL02 | PL03 | PL04 | PLFL |
| RGB |
CH01 CH02 CH03 |
CH1/ R fade |
CH2/G fade | CH3/B fade | Non-used | RGB fade |
| RGBW |
CH04 CH05 CH06 |
CH1/R fade | CH2/G fade | CH3/B fade | CH4/W fade | RGBW fade |
| CCT | CH07 | WW fade CH1+CH3 | CW fade CH2+CH4 | Non-used | Non-used | WW+CW fade |
| CCT | CH08 | WW fade CH1 | CW fade CH2 | WW fade CH3 | WW fade CH4 | CW+WW fade |
| DIM | CH09 | Non-used | Non-used | Non-used | Non-used | CH1-CH4 fade |
Set test mode speed
Press the "MODE" key, when the digital tube displays SPxx (xx is 01-99), enter the test mode speed adjustment. Press the UP / DOWN key to adjust the speed (long press for quick adjustment), the digital tube displays the current speed in real time (sp01 is the slowest, sp99 is the fastest).
Please press SAVE to save the setting operation, the digital tube will display "SAVE" and automatically exit the setting state after 1 second.
Advanced settings
Long pressing the MODE and SAVE buttons for 3 seconds to enter the advanced settings. After entering the advanced settings, press the MODE button can switch to DMX decoding profile setting, PWM frequency setting, Gamma curve selection and Restore factory default.
DMX decoding profile setting
Press "MODE" key, when the digital tube displays CHxx (xx is 01-09), enter DMX512 decoding profile setting. Select the DMX512 decoding profile by pressing the UP / DOWN keys.
| Display | Output type | # of DMX address | DescriptionпјҲassumes DMX start address of d001пјү |
| CH01 | RGB | 3 |
DMX address 1= RED channel 1 DMX address 2= GREEN channel 2 DMX address 3= BULE channel 3 |
| CH02 | RGB | 4 |
DMX address 1= RED channel 1 DMX address 2= GREEN channel 2 DMX address 3= BULE channel 3 DMX address 4= Master intensity/flash/full light* |
| CH03 | RGB | 6 |
DMX address 1= RED channel 1 DMX address 2= GREEN channel 2 DMX address 3= BULE channel 3 DMX address 4= Master intensity/flash/full light* DMX address 5= Preset chase speed DMX address 6= Preset chase** |
| CH04 | RGBW | 4 |
DMX address 1= RED channel 1 DMX address 2= GREEN channel 2 DMX address 3= BULE channel 3 DMX address 4= WHITE channel 4 |
| CH05 | RGBW | 5 |
DMX address 1= RED channel 1 DMX address 2= GREEN channel 2 DMX address 3= BULE channel 3 DMX address 4= WHITE channel 4 DMX address 5= Master intensity/flash/full light* |
| CH06 | RGBW | 7 |
DMX address 1= RED channel 1 DMX address 2= GREEN channel 2 DMX address 3= BULE channel 3 DMX address 4= WHITE channel 4 DMX address 5= Master intensity/flash/full light* DMX address 6= Preset chase speed DMX address 7= Preset chase** |
| CH07 | CCTпјҲWW+CWпјү | 3 |
DMX address 1= Master intensity for CW+WW (CH1-CH4) DMX address 2= WW channel 1+channel 3 DMX address 3= CW channel 2+channel 4 |
| CH08 | CCTпјҲWW+CWпјү | 6 |
DMX address 1= Master intensity for WW channel 1 + CW channel 2 DMX address 2= WW channel 1 DMX address 3= CW channel 2 DMX address 4= Master intensity for WW channel 3 + CW channel 4 DMX address 5= WW channel 3 DMX address 6= CW channel 4 |
| CH09 | DIMпјҲsingle colorпјү | 1 | DMX address 1= Dimmer channels 1-4 |
** Preset chase list
| DMXvalue | ChaseпјҲassumes DMX start address of d001пјү |
| 0-20 | пјҲRGBпјҡd001-d004пјӣRGBWпјҡd001-d005пјүcontrol effects |
| 21-40 | 3 colors fade |
| 41-60 | 7 colors fade |
| 61-80 | 3 colors jump |
| 81-100 | 7 colors jump |
| 101-120 | GREEN-RED fade |
| 121-140 | RED-BLUE fade |
| 141-160 | BLUE- GREEN fade |
| 161-180 | RGB bloom fade |
| 181-200 | WHITE fade |
| 201-220 | 7 colors bloom fade |
| 221-255 | The loop of above chases |
PWM frequency setting
Press "MODE" key, when the digital tube displays PFxx, enter the PWM frequency setting. Set the PWM frequency by pressing UP / DOWN.
| Display | PWM frequency |
| PF05 | 500Hz |
| PF10 | 1KHz |
| PF20 | 2KHz |
| PF40 | 4KHz |
| PF80 | 7.8KHz |
| PFF0 | 15.6KHz |
Dimming response gamma curve setting
Press "MODE" key, when the digital tube displays gAxx. Enter the gamma curve selection. Select the desired gamma curve by pressing the UP / DOWN keys.
| Display | Gamma value |
| gA01 | 0.1 |
| gA05 | 0.5 |
| gA10 | 1.0 |
| gA15 | 1.5 |
| gA22 | 2.2 |

Please press SAVE to save the setting operation, the digital tube will display "SAVE" and automatically exit the setting state after 1 second.
Restore factory settings
Press the "MODE" key, when the digital tube displays rst0, enter the factory reset. By pressing the UP / DOWN key and pressing the "SAVE" key when the digital tube displays rst1, the decoder enters the factory reset. The digital tube will display rst- and switch to d001 automatically after 1 second to finish the operation.
Application diagram

Notice
1. The power supply voltage of this product is DC12V ~ 24V, other voltages may damage it;
2. The lead-out wires should be correctly wired according to the labels provided in the wiring diagram;
3. When more than 32 decoders are connected, it needs to be used with DMX signal amplifiers, the number of DMX signal amplifiers does not exceed 5.
4. If the signal has a kickback effect due to short circuit or poor quality of the signal cable, please use a 0.25W90-120 ohm resistor at the end of the last decoder D + and D-;
5. This product has short-circuit protection function, but it should not be overloaded;
6. The warranty period of this product is 3 years, exclude man-made damage or the form of overload work.
Product information for placing order
| Product name | Item number |
| DMX512 RDM decoder | HX-DR01 |
| DMX512 RDM master | HX-DR02 |
| DMX512 signal amplifier | HX-DR03 |
Product Video
Data download
Keywords:гҖҖжҺ§еҲ¶еҷЁ гҖҖled гҖҖи°ғ гҖҖHX-SZ600-TOUCH гҖҖHX-SZ600- гҖҖHX-RFBT002-RGB


 Jane-Hoion