-
Product Introduction:
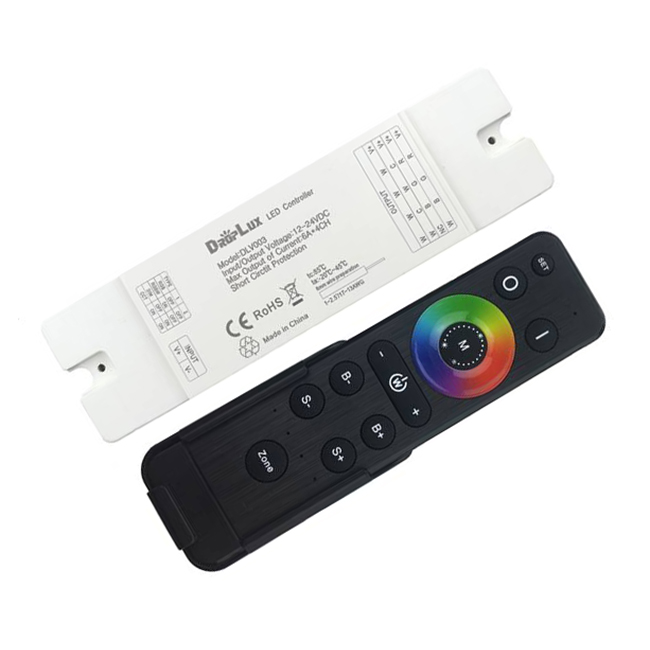
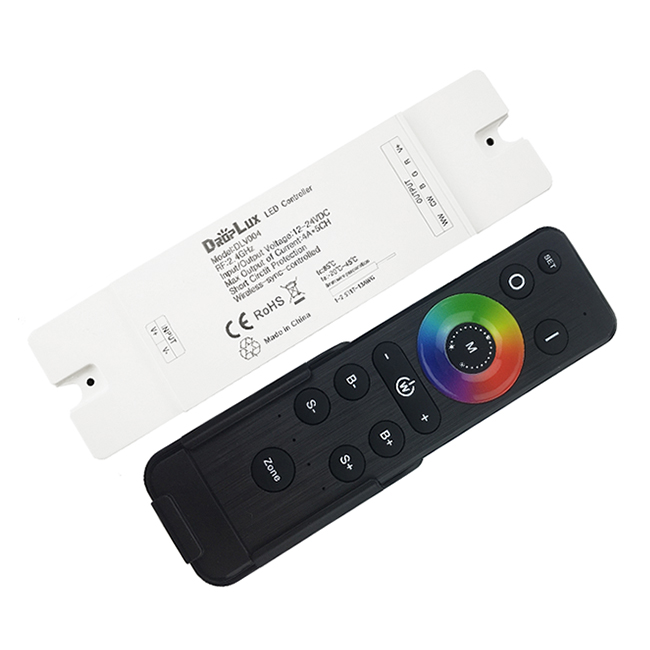
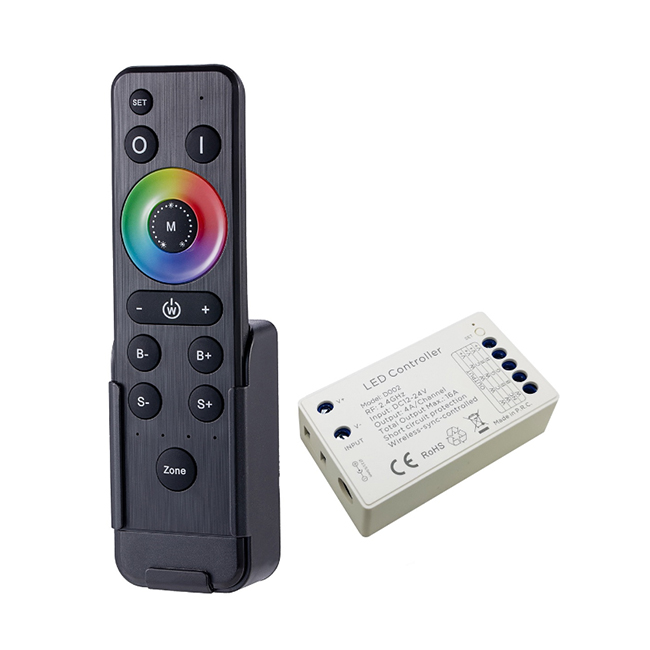
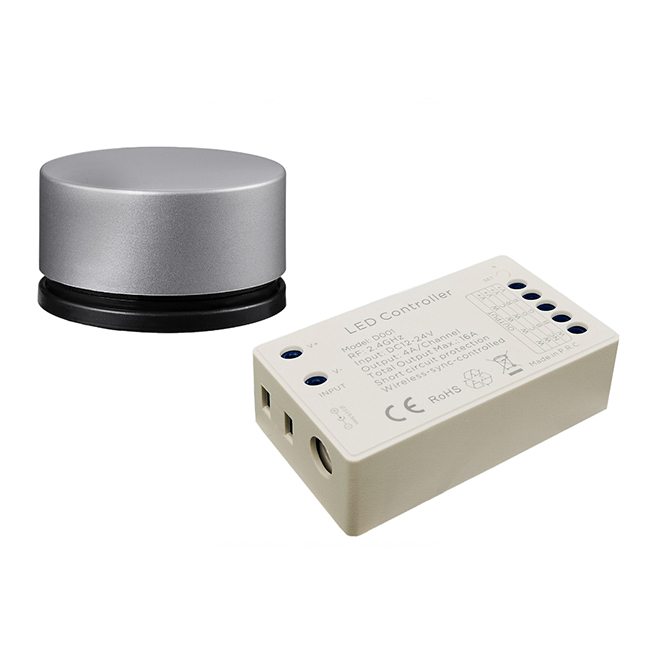
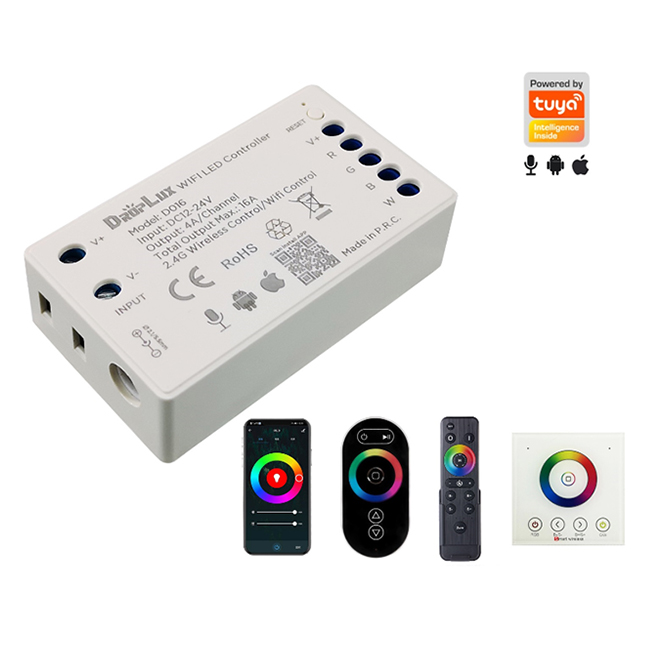
4 in 1 2.4GHz wireless-sync-control RF remote controller-DIM/CCT/RGB/RGBW Controller adopts the most advanced PWM (Pulse Width Modulation) digital control technology, it is used for controlling constant voltage LED lamps. For instance, point source of light, flexible light strip, led modules, led strings and so on; It belongs to low-voltage DC power input and output with five interfaces, including V+ is extremely common interfaces, the other four for the 4 channels output control interface. Mean
Product Details
- Designed as 4 in 1 controller for DIM/CCT/RGB/RGBW constant voltage LED lights.
- DC12-24V, four channels output, Max. load current: 4CH*6A; Max. load power: 288W/12V; 576W/24V.
- Adopts RF remote control, no need line-of-sight. 4 zones separately control or all-control.
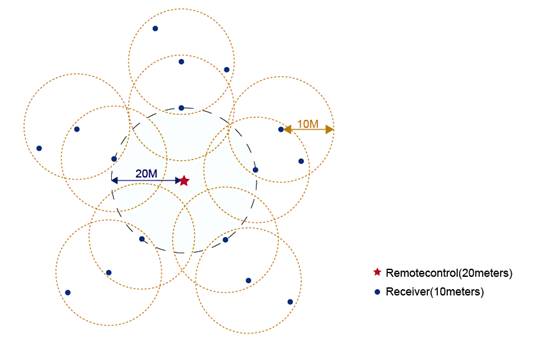
- Wireless-sync-control in both static color and dynamic modes, unlimited by remote control distance.
- Batch-operation is available for RF code matching/clearing between remote control and receivers.
- Memory function, each time power-on reserve the mode which stop in the last power-off.
- Perfect control effect, including 1024 static colors(RGB/RGBW) and soft dim function.
- The brightness of static color is adjustable, 1024 levels in total; the speed of dynamic changes is adjustable, 100 levels in total.
- Long-press the brightness and speed key can get the fast adjustment, convenient for operation.
- Short circuit protection.
- Warranty of this product is three years, exclude the artificial situation of damaged or overload working.
Controller
| Working temperature | -20-60℃ | Supply voltage | DC12V-24V |
| Static power consumption | <1W | Connecting mode | Common anode |
| Grayscale | 1024levels | Speed stage | 100 grade |
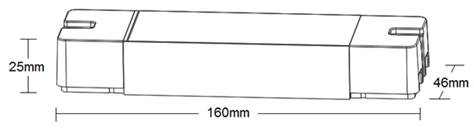
| External dimension | L160*W46*H25 mm | Packing size | L170*W50*H29mm |
| Net weight | 100g | Gross weight | 130g |
| RF frequency | 2.4GHz | RF distance | ≤20m |
| Short circuit protection | Yes | Memory function | Yes |
| Output | 4 channels | Output current | ≤6A(each channel) |
| PWM frequency | 1KHz | Max. Output power | 12V:<288W, 24V:<576W |
| Working temperature | -20℃~60℃ | Supply voltage | DC3V(AAA*2) |
| Standby current | <18uA | Working current | <25mA |
| Standby power | 54uW | Working power | 75mW |
| Net weight | 95g | RF frequency | 2.4GHz |
| External dimension | L150*W40*H20 mm | RF distance | ≤20m |
Dimensions
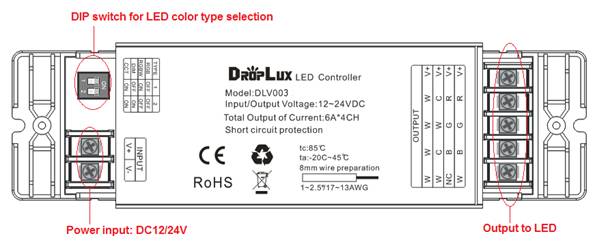
Interface Specifications
Direction for use
Step 1: Connect the load wire at first, followed by the power wire, please ensure short circuit can not occur between wires before turning on the power;
Step 2: Setting the type of output as blow, please ensure the DIP switch in correct state according to the loading LED’s type:
| RGB | RGBW | DIM | CCT |
 |
 |
 |
 |
Step 3: Matching the code with remote. Before matching the code, receiver can be controlled by any remote control in any zone (the functions are according to receiver’s DIP switch setting in Step 2). Matching code operation will set the receiver to correct zone and also achieve unique-control. Please read “About RF code” part for operation instruction.
Wireless-synchronization function
RF remote button functions
1 color ring and 12 buttons in total, the function of buttons are shown as below:
Type 1: Single color
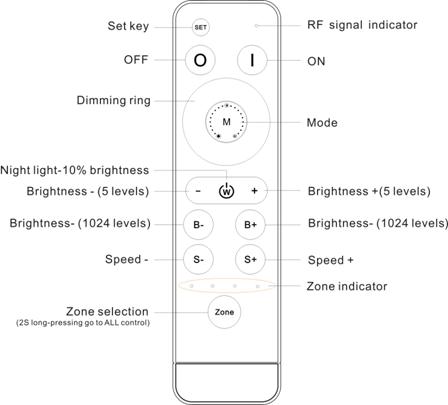
| Name | Description |
 |
Nonfunctional. |
 |
Turn on. |
 |
Turn off. |
| Dimming ring | Dim down brightness by clockwise direction. |
 |
2 modes in total: flash, fade. |
 |
10% night light hot key |
 |
Brightness – by 5 levels (10%, 30%, 50%, 70%, 100%) |
 |
Brightness + by 5 levels (10%, 30%, 50%, 70%, 100%) |
 |
Brightness – by 1024 levels. Long-press can get fast adjusting. |
 |
Brightness + by 1024 levels. Long-press can get fast adjusting. |
 |
Speed down for dynamic mode (100 levels). Long-press can get fast adjusting. |
 |
Speed up for dynamic mode (100 levels). Long-press can get fast adjusting. |
 |
Zone selection, 2 seconds long-press get “all-control”. |
Type 2: CW+WW
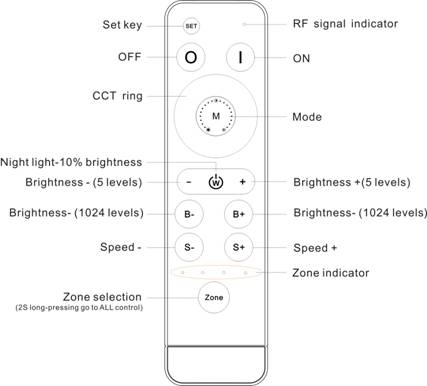
| Name | Description |
|
|
Nonfunctional |
|
|
Turn on |
|
|
Turn off |
| CCT ring | Corresponding full range color temperature of the tunable LED from 100%CW to 100%WW. |
|
|
4 modes in total: all flash, 2 color flash, all fade, 2 color fade. |
|
|
10% night light hot key |
|
|
Brightness – by 5 levels (10%, 30%, 50%, 70%, 100%) |
|
|
Brightness + by 5 levels (10%, 30%, 50%, 70%, 100%) |
|
|
Brightness – by 1024 levels. Long-press can get fast adjusting. |
|
|
Brightness + by 1024 levels. Long-press can get fast adjusting. |
|
|
Speed down for dynamic mode (100 levels). Long-press can get fast adjusting. |
|
|
Speed up for dynamic mode (100 levels). Long-press can get fast adjusting. |
|
|
Zone selection, 2 seconds long-press get “all-control”. |
Type 3: RGB
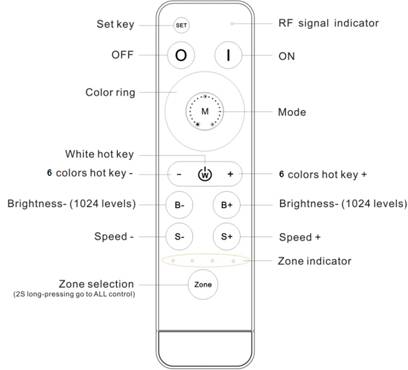
| Name | Description |
|
|
Nonfunctional. |
|
|
Turn on. |
|
|
Turn off. |
| Color ring | Static color options, 64 colors in total. |
|
|
Dynamic modes, 8 modes in total. |
|
|
White color hot key |
|
|
6 static colors (cyan, purple, yellow, blue, green, red) |
|
|
6 static colors ( red, green, blue, yellow, purple, cyan) |
|
|
Brightness – for static colors by 1024 levels. Long-press can get fast adjusting. |
|
|
Brightness + for static colors by 1024 levels. Long-press can get fast adjusting. |
|
|
Speed down for dynamic mode (100 levels). Long-press can get fast adjusting. |
|
|
Speed up for dynamic mode (100 levels). Long-press can get fast adjusting. |
|
|
Zone selection, 2 seconds long-press get “all-control”. |
8 dynamic modes as below:
| No | Patterns | Remarks | No | Patterns | Remarks |
| 1 | White breathe |
Speed is adjustable, brightness is unadjustable |
5 | 7 color fade |
Speed is adjustable, brightness is unadjustable |
| 2 | 3 color jumpy | 6 | R/G cross fade | ||
| 3 | 7 color jumpy | 7 | R/B cross fade | ||
| 4 | 3 color fade | 8 | G/B cross fade |
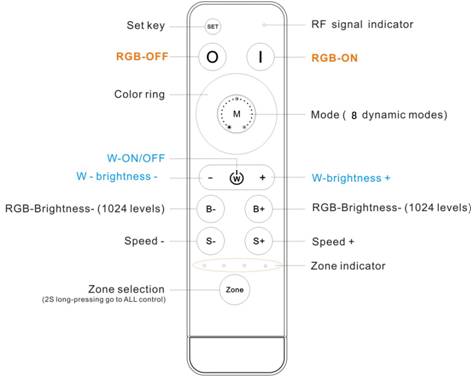
| Name | Description |
|
|
Nonfunctional. |
|
|
RGB channels-Turn on. |
|
|
RGB channels-Turn off. |
| Color ring | Static color options, 64 colors in total. |
|
|
Dynamic modes, 8 modes in total. |
|
|
W channel-Turn ON/OFF. |
|
|
W channel- brightness -, 1024 levels, long-press can get fast adjusting. |
|
|
W channel- brightness +, 1024 levels, long-press can get fast adjusting. |
|
|
Brightness – for static colors by 1024 levels. Long-press get fast adjusting. |
|
|
Brightness + for static colors by 1024 levels. Long-press get fast adjusting. |
|
|
Speed down for dynamic mode (100 levels). Long-press get fast adjusting. |
|
|
Speed up for dynamic mode (100 levels). Long-press get fast adjusting. |
|
|
Zone selection, 2 seconds long-press get “all-control" |
8 dynamic modes as below:
| No | Patterns | Remarks | No | Patterns | Remarks |
| 1 | White breathe |
Speed is adjustable, brightness is unadjustable |
5 | 7 color fade |
Speed is adjustable, brightness is unadjustable |
| 2 | 3 color jumpy | 6 | R/G cross fade | ||
| 3 | 7 color jumpy | 7 | R/B cross fade | ||
| 4 | 3 color fade | 8 | G/B cross fade |
This system is available to achieve mixed control, like zone 1-single color, zone 2-CCT, zone 3- RGB, zone 4- RGBW.
The all buttons’ functions are active in all-control mode, the effect for each zone will according to the output type setting of each receiver.
Typical Applications
Application Circuit 1: Single color ( V+→V+、CH1→GND、CH2→GND、CH3→GND, CH4: GND.)
Application Circuit 2: CW+WW (V+→COMMON, CH1→CW, CH2→WW, CH3→CW, CH4: WW.)
Application Circuit 3: RGB ( V+→COM, CH1→R, CH2→G, CH3→B, CH4: NC.)
Application Circuit 4: RGBW ( V+→COM, CH1→R, CH2→G, CH3→B, CH4: W.)
About RF code.
The biggest advantage of this system is that it can not only solve the cabling problem in engineering wirelessly, but also realize a wired-like operation experience. In order to facilitate the early testing and debugging of the project, the factory status of the receiver is normally unpaired and each remote controller has a unique code value. The user should perform the matching work of the remote controller and the receiver during the installation of the project to avoid the mutual influence of the radio frequency remote control technology during the later use.
Please pay attention to the following 3 points before operation:
1) All equipment in the complete system after installation should have a unified and unique code value, so as to achieve the security and stability of the system.
2) The receiver can only store one code value and cannot be overwritten. Before learning the new code value, it is necessary to clear the original code of the receiver; the remote controller can only save one code value but can be overwritten and can also restore the factory settings. In order to facilitate the later maintenance, the three components that may be involved in the system (including receivers, handheld remote controllers, and panel remote controllers) can realize mutual learning of code values.
3) Since the receiver performs code value learning in the power-on state, batch-operation is available ( power-one the all receivers which will be in same zone, and operate the matching/clearing the RF code all of them at the same time). And in order to avoid confusion in the area, it is recommended that each area has an independent power switch so that the power of other areas can be easily cut off when the code is being operated.
(1)Code pairing operation: means that the receiver will only be controlled by the value code remote controller.
| Step | Operation | Instructions |
| 1 | Connecting the load to the receiver and power on it. |
1.It is necessary to clear the code first, if the receiver was coded before. 2.Batch operation can be performed within the remote control range. |
| 2 | Select area | Select the area with the "Zone" key and the corresponding indicator lights up |
| 3 | Press and hold “ON” on the remote control for 5 seconds, the indicator of the remote control will flash quickly, means it enters the pairing code transmission status. | Will automatically exit code transmission status after 60 seconds, or pressing any key to exit. |
| 4 | See the load light flashes 3 times and return to the initial state | Pairing coding is finished successfully |
| Step | Operation | Instructions |
| 1 | Connecting the load to the receiver and power on it. |
1. The clearing operation should be finished within 1 minute after the receiver is powered on. If exceeds the time, can be powered on again. 2. Batch operation can be performed within the remote control range. |
| 2 | Press and hold the remote control “Off” for 5 seconds. The indicator of the remote control flashes quickly, means it enters the clearing code transmission status. There is no need to select the corresponding area when clearing code. |
1. Will automatically exit code transmission status after 60 seconds, or pressing any key to exit. 2. If the original remote controller is lost, the new remote controller can be used for clearing operations. |
| 3 | See the load light flashes 3 times and return to the initial state | Clearing coding is finished successfully |
| Step | Operation | Instructions |
| 1 | A remote control:Press and hold “ON” on the remote control for 5 seconds, the indicator of the remote control will flash quickly, means it enters the pairing code transmission status. | Will automatically exit code transmission status after 60 seconds, or pressing any key to exit. |
| 2 | B remote control: long press "mode key" for 5 seconds, the remote indicator light changes from 100% light to off, means entering the code value receiving state | Will automatically exit the code value receiving state after 30 seconds, or exit after learning the code value successfully. |
| 3 | see the B remote control indicator light flash 3 times | Code copying is finished and exit code value receiving status. |
| Step | Operation | Instructions |
| 1 | Cut off the power of receiver. | Which one will be controlled by remote. |
| 2 | Long-press "mode key" for 5 seconds, the remote indicator light changes from 100% light to off, means entering the code value receiving state. | Will automatically exit the code value receiving state after 30 seconds, or exit after learning the code value successfully. |
| 3 | Power on the receiver, will see remote control indicator light flash 3 times. | Code copying is finished and exit code value receiving status. |
(5)The remote controller restores the factory setting: it means that the remote controller will be restored to the factory's unique code value.
| Step | Operation | Instructions |
| 1 | Long press "mode " for 20 seconds | The remote indicator light dim down and flashes continuously until the 20th second and then back to 100% light. Means this step is finished. |
| 2 | Press the "OFF" to confirm, the remote indicator light flashes 3 times | Restore factory settings successfully. |
2. There are 2 options for bracket installation:
1) Using screw and expansion tube make drilling installation (suitable for uneven and ash surface);
2) Using 3M foam sponge glue make free drilling installation (suitable for flat no ash surface).
Product information for placing order
| Product name | Item number |
| 4 in 1 LED controller with RFBK remote |
HX-DLV003-RFBK Receiver: HX-DVL003 Remote control: HX-RFBK-RGB-2.4G |
Product Video
Data download


Keywords: 控制器 led 调 HX-SZ600-TOUCH HX-SZ600- HX-RFBT002-RGB

 Jane-Hoion