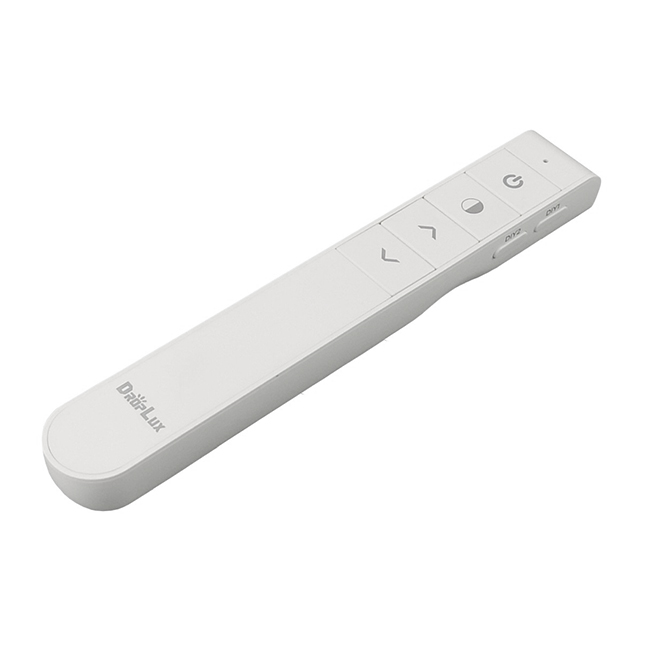
4-zone Remote Control For Dual-white Led Luminaries Release

ITEM CODE: HX-RFBK-CCT-2.4G
Product Feature
1пјүProduct supply voltage is 3V(AAA*2)
2пјүAdopt 2.4G wireless control, with feature of long distance and non-directional control
3пјүFull keys design, unique interface, simple operation
4пјүMulti zone control function simple: could control single zone or overall zones; controlled area indicated by indicator light , more intuitive
5пјүHanging storage way, more easy to access and storage
6пјүTwo ways for accessories installation, flexible choice
7пјүTwo Colors: Black/White
8пјүRFBK-DIM-2.4G match with HC series dimming driver for both CC and CV LED luminaries
9пјүThree years warranty
Technical Parameters
| Working temperature | -20-60в„ғ | Working voltage | 3V пјҲAAA*2PCSпјү |
| Sleep current | <25uA | Emission current | <30mA |
| Sleep power consumption | <75uW | Emission power consumption | <90mW |
| Net weight | 55g | Dimension | L148*W40*38 (mm) |
| RF distance | ≤30m | RF frequency | 2.4GHz |
| Accessories | Remote control rack, 3M foam sponge glue, M4 double-headed self-tapping screws, φ6 expansion tube, battery, manual | ||
Direction for use
| Name | of key Description | |
| ON | ON in any time | |
| OFF | OFF in any time | |
| Mode | 3 static modesпјҡwarm white, cool white, pure white | |
| Brightness + | The brightness will add 1 level after each time press. Long-press can get fast adjusting. | |
| Brightness - | The brightness will reduce 1 level after each time press. Long-press can get fast adjusting. | |
| CW balance key | Balance to cool white. Long-press can get fast adjusting. | |
| WW balance key | Balance to warm white. Long-press can get fast adjusting. | |
| Zone selection key | Selection for the control zone (The corresponding zone indicator will light up when selected, support single zone control and overall control) | |

RemarkпјҡShort press the zone selection key is for switch between the single zones; Long press the zone selection key for more than 3s is for all zones selection, 4 indicator lights will light up at the same time, and overall control for lamps from all zones.
Zone-setting
Multi-zone remote control need to set the zone before using, that means match each driver to the corresponding group.
Matching Zone operation
Step 1: Connect the driver with load LED(Without power on)
Step 2: Select the zone( press the zone selection key makes the indicator lamp for the corresponding zone light up)
Step 3: Pressing the key “Mode” and power on the driver, the load LEDs will be 50% brightness white as responding. Means entered the learning code/ clear code status successfully.(Notice: Step 3 need to within 8s after step 2, zone indicator lamp will be off after without any operation for 8s )
Step 4:Continuously to press the key “On” for 3 times within 5 seconds after step 3, the brightness of LEDs will change from 25%-10%-back to preset level. Code learning successfully.
If not, please re-operate from step 1 to 4.пјҲNotice: Power on again the driver to enter the code learning status should be 10s after last power-downпјү
Clear code operation
Clear code between the driver and remote control is for backing to factory default.
After clear code successfully, the driver can be controlled by anyone the same model remote control or the remote control not the same model but compatible with each other.
Step 1: Connect the driver with load LED(Without power on)
Step 2: Pressing the key “Mode” and power on the driver, the load LEDs will be 50% brightness white as responding. Means entered the learning code/ clear code status successfully(No need to select the zone, remote control in any zone status can be used to clear code for drivers in any zones)
Step 3: Continuously to press the key “Brightness -” for 3 times within 5 seconds after step 2, the brightness of LEDs will change from 25%-10%-back to preset level. Code clearing successfully
If not, please re-operate from step 1 to 4.пјҲNotice: Power on again the driver to enter the code learning status should be 10s after last power-downпјү. Anyone the same model remote control or the remote control not the same model but compatible with each other can be used to clear code.
Noticeпјҡ
1пјүEach driver can save 4 different RF codes ( it means each driver can be controlled by 4 different-code remote in the Max).If there is confusion,, more remote control all can control, just clear the code and then use the specified remote control re-code with the driver.
2пјүAnyone the same model remote control or the remote control not the same model but compatible with each other can be used to clear code.
5. Remote control accessories installation instructions
1пјүRemote control accessories list as below:
| Remote control rack 1pc | 3M foam sponge glue 1pc | M4 double-headed self-tapping screw 1pc | φ6 expansion tube 1pc |
 |
 |
 |
 |
2пјүRemote control rack installation instructions:
There are two different installation methods for the remote control rack, customers can choose to install according to the different situation;
вҳҶThe first installation method: free drilling installation (for flat no ash surface)
пјҲ1пјүFirst, tear off the protective film for one side of 3M foam sponge glue, then affixed it on the behind circle of the remote control rack;
пјҲ2пјүTear off the protective film for other side of 3M foam sponge glue, and stick the remote control rack on the place where you want to stick.
пјҲ3пјүHang the remote control on the rack after installation

вҳҶThe second installation method: free drilling installation(suitable for uneven and ash surface)
(1) Drill a hole on the wall with a 6mm drill bit;
(2) Install the φ6 expansion tube in the hole;
(3)Twist the tip end of the M4 double-headed self-tapping screw into the expansion tube;
(4) Install the remote control rack on the screw like below
(5) Hang the remote control on the rack after installation

 Jane-Hoion